For overseas laptop distributors and repair shop owners, replacing a keyboard is far more than a simple DIY task—it’s a critical business decision fraught with hidden risks. A misdiagnosis can turn a quick fix into a costly repair, wiping out your margin. An unstable supply of low-quality compatible parts leads to comebacks and erodes hard-earned customer trust. This 2024 Ultimate Guide moves beyond basic step-by-step instructions to provide a strategic decision-making framework. We will equip you with a professional methodology that transforms keyboard replacement from a routine service into a reliable profit center, covering precise fault diagnosis, cost-effective OEM sourcing from China, and foolproof installation techniques to safeguard your reputation and your bottom line.
Dimension 1: Precise Diagnosis — Confirming Replacement is the Only and Necessary Solution
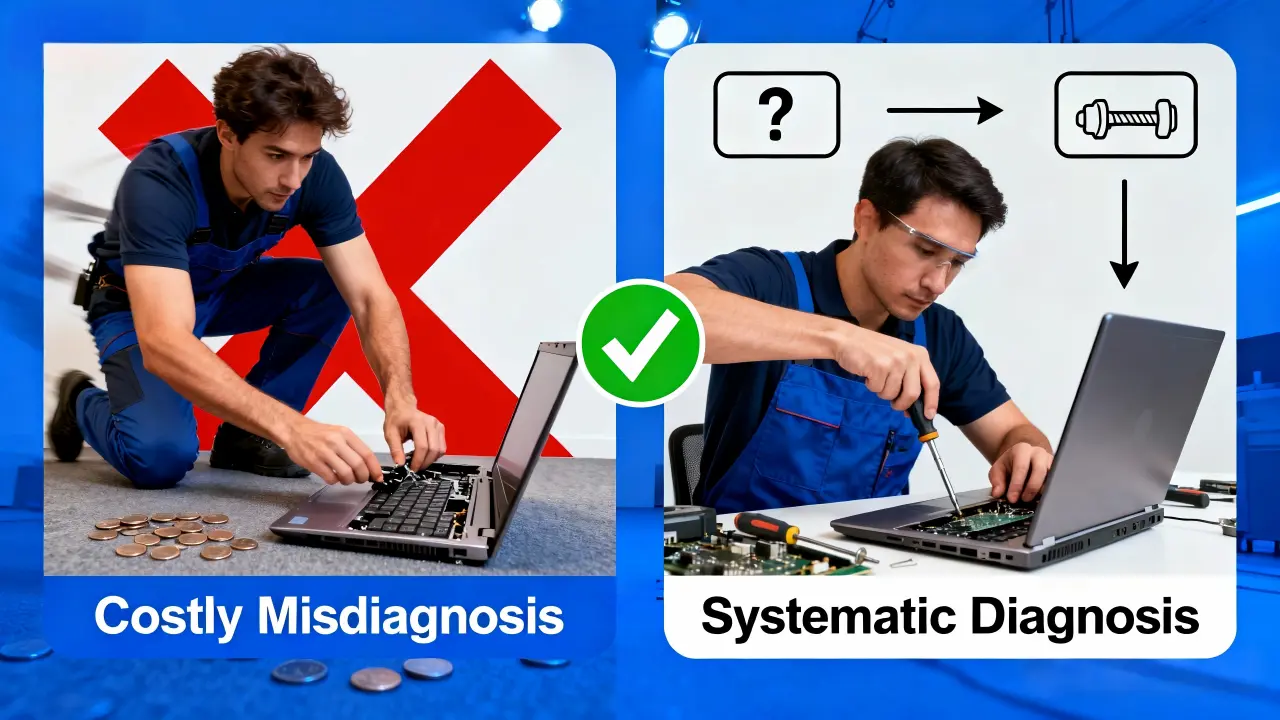
Rushing to order a replacement keyboard without a proper diagnosis is the most common and costly mistake. It’s the equivalent of performing surgery before identifying the illness. This phase of our methodology is designed to eliminate guesswork, saving you the cost of unnecessary parts and the time of futile repairs. Our goal is to move from symptoms to a definitive cause with a clear, two-tiered diagnostic approach.
Step One: Software and Driver Layer Exclusion
Before any physical tools are picked up, you must rule out software-related issues. This is a non-invasive, zero-risk process that can instantly resolve what seems like a hardware failure.
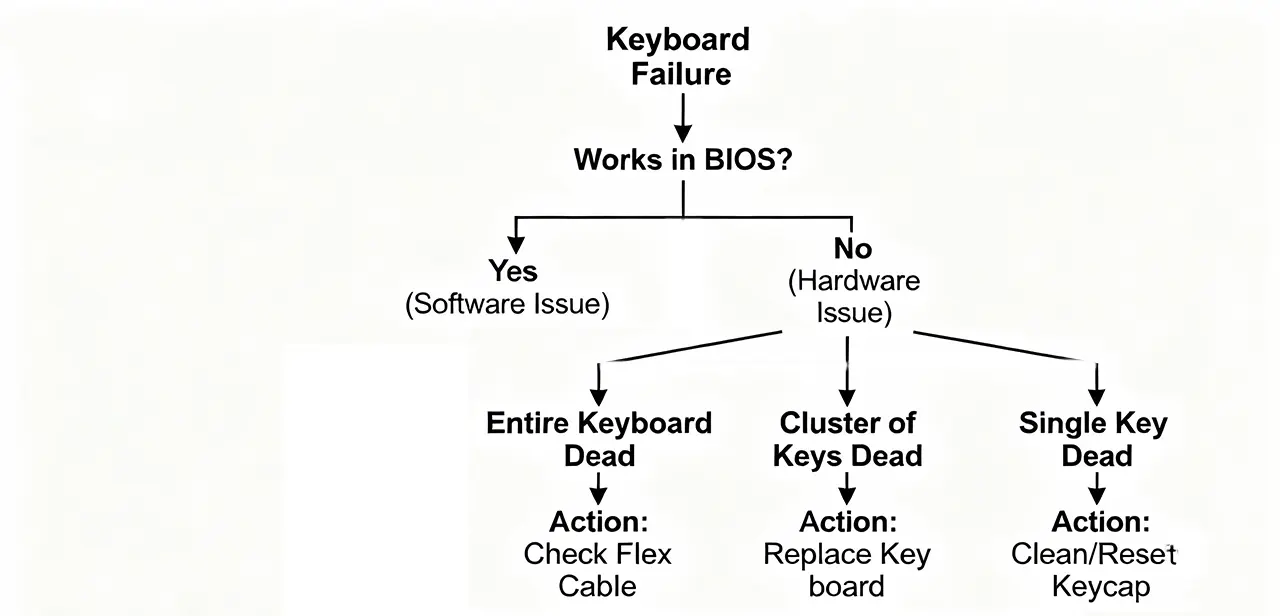
The Gold Standard: BIOS/UEFI Test.This is the most critical test. Restart the laptop and repeatedly press the key (like F2, Del, or F10) to enter the BIOS/UEFI setup utility. The critical question:Does the keyboard respond correctly in this pre-Windows environment?
If the keyboard FAILS in the BIOS:There is a >90% probability of a genuine hardware fault. You can confidently proceed to the hardware diagnosis in Step Two.
If the keyboard WORKS in the BIOS:The keyboard itself is almost certainly functional. The problem lies with the operating system (Windows/macOS), a corrupted driver, or a setting. Your solution involves OS-level troubleshooting, not a physical replacement.
In-OS Troubleshooting:Within the operating system, go to Device Manager, uninstall the keyboard driver, and restart your computer to allow it to reinstall. Also, check the Ease of Access settings to ensure features like Filter Keys or Sticky Keys are not accidentally enabled, which can cause erratic behavior.
Step Two: Hardware Fault Localization (The Decisive Check)
If the keyboard fails the BIOS test, you are dealing with a hardware issue. The failure pattern tells you exactly what to do next. Follow this decision tree:
Symptom: The entire keyboard is dead.
Most Likely Cause:A disconnected or damaged flex cable, or a faulty keyboard connector on the motherboard.
Action:This is the first thing to check during the physical repair. Before ordering a new keyboard, you will open the laptop and reseat the connection. Often, this alone solves the problem.
Symptom: A specific section or random cluster of keys is unresponsive.
Most Likely Cause:This is a classic sign of a failure within the keyboard’s internal membrane circuit layers. This is a definitive hardware failure of the keyboard unit itself.
Action:A full keyboard replacement is necessary. Cleaning or reseating will not fix this.
Symptom: Only a single key is not working.
Most Likely Cause:A trapped piece of debris, a dislodged scissor-switch mechanism, or a localized fault under that specific key.
Action:Try carefully removing the keycap, cleaning underneath, and reseating the scissor mechanism. A full keyboard replacement is often NOT required for a single key issue.
Strategic Insight:Industry data suggests that up to 30% of keyboard replacement requests are based on a misdiagnosis. Implementing this strict diagnostic protocol can immediately save you and your business from 30% of unnecessary part costs and wasted labor. It is the foundation of professional and profitable repair service.
Dimension 2: Cost & Supply Chain — Why Sourcing Quality OEM Keyboards from China is a Strategic Choice

For the business owner, the decision of whichkeyboard to buy is as critical as knowing howto install it. Choosing based on the lowest sticker price is a short-sighted gamble that often leads to comebacks, damaged reputation, and eroded profits. This dimension of our framework moves beyond simple procurement to analyze Total Cost of Ownership (TCO), arguing that sourcing quality OEM (Original Equipment Manufacturer) keyboards from China, particularly from a specialized hub like Shenzhen, is not an expense but a strategic investment in your business’s stability and growth.
Quality & Compatibility: The Unseen Value of OEM vs. Generic Replacements
The most significant risk of a generic “compatible” keyboard is unpredictable quality. While it may physically fit, subtle deviations in thickness, material rigidity, or connector alignment can lead to a host of issues.
Precision Fit:True OEM keyboards are built to the exact original specifications, ensuring perfect alignment with screw posts, clip locations, and the palm rest surface. This guarantees a seamless installation without the need for modification and a factory-finish look.
Performance Consistency:The feel and response of the keyboard—the tactile feedback, key travel, and backlighting uniformity—are consistent with the original device. This preserves the user experience and prevents customer complaints about a “cheap feel.”
Electrical Reliability:OEM components use higher-grade materials and undergo stricter quality control, ensuring long-term electrical stability and significantly reducing the risk of premature failure and costly warranty returns.
Total Cost of Ownership (TCO): The True Metric for Profitability
The initial purchase price is just one part of the financial equation. The true cost of a keyboard includes all associated expenses throughout its lifecycle.
Cost Factor | Generic Compatible Keyboard | Quality OEM Keyboard (e.g., from SUP) |
|---|---|---|
Initial Purchase Price | Lower | Slightly Higher |
Return Rate & Warranty | High (5-10% common) | Very Low (<1-2%) |
Installation Time/Labor | Potentially higher due to fitment issues | Predictable and efficient |
Customer Comebacks | High risk, damaging reputation | Minimal risk, builds trust |
Long-Term Reliability | Unpredictable, short average lifespan | High, predictable longevity |
As the table illustrates, the higher initial investment in a quality OEM keyboard is amortized over its lifespan through near-zero returns, faster installations, and superior customer satisfaction. The TCO is almost always lower, protecting your profit margins.
The Shenzhen Advantage: Ecosystem, Elasticity, and Expertise
Shenzhen is not just a city of factories; it’s the world’s most dynamic electronics ecosystem. Sourcing from here provides strategic advantages that other regions cannot match.
Supply Chain Elasticity:The concentration of suppliers, component manufacturers, and logistics experts in one region creates an incredibly resilient and responsive supply chain. This allows reliable partners like SUPto manage demand fluctuations, ensure stable MOQs (Minimum Order Quantities), and offer flexible lead times.
Technical Collaboration:A professional supplier in Shenzhen acts as a technical partner. They can provide detailed compatibility matrices, assist with identifying alternative parts for end-of-life models, and offer insights into future product trends. This collaborative relationship transforms your supplier from a simple vendor into an extension of your own procurement and R&D team.
Strategic Sourcing:By consolidating your keyboard sourcing with a trusted expert in the OEM ecosystem, you simplify your logistics, gain leverage for better pricing, and build a foundation of quality that becomes your competitive advantage in your local market.
In summary, the decision to source OEM keyboards from China is a decision to prioritize long-term business health over short-term cost savings. It is the core of a profitable and scalable repair and distribution operation.
Dimension 3: Pre-Repair Preparation — Professional Tools and Mindset as the Guarantee of Zero Errors
The line between a successful, profitable repair and a costly disaster is drawn long before the first screw is turned. Professional results are born from professional preparation. This dimension focuses on the tools and mindset that transform a risky procedure into a predictable, repeatable process, safeguarding both the client’s device and your business’s reputation.

The Non-Negotiable Toolkit: Safety and Precision Above All
Using the correct tools is not a suggestion; it is the fundamental prerequisite for a professional repair. Improvising with household items is the hallmark of an amateur and introduces unacceptable risks.
Plastic Spudgers and Opening Picks (Not Metal Tools):This is the most critical rule. Metal tools are conductiveand can easily cause short circuits on the motherboard, leading to catastrophic and irreversible damage. Plastic spudgers are insulating, and their specific design allows you to apply leverage without gouging or cracking the delicate plastic clips that hold the laptop together. They are essential for a scratch-free, safe disassembly.
Anti-Static Wrist Strap (ESD Protection):The integrated circuits on a laptop motherboard are extremely sensitive to electrostatic discharge (ESD), which is invisible to the human touch. A single static shock from your body can weaken or destroy these components, causing intermittent or immediate failure. An anti-static wrist strap, properly grounded, channels this electricity away from the device, protecting your client’s valuable hardware.
Magnetic Project Mat and Precision Screwdrivers:A magnetic mat with a grid is indispensable for organization. Laptops use screws of different lengths and types in specific locations. Using a screw that is too long in the wrong place can pierce the keyboard, damage the motherboard, or crack the screen. The mat allows you to lay out screws in the exact pattern they are removed, guaranteeing they are reinstalled correctly. Precision screwdrivers (primarily PH0 and PH00 bits) ensure a perfect grip, preventing the stripping of screw heads—a common and frustrating problem.

The Knowledge Foundation: Your Pre-Repair Checklist

The physical tools are useless without the right information. A professional never proceeds based on assumption.
Secure the Official Guide:Never rely on memory. Before starting, always search for and review the specific teardown guide or hardware maintenance manualfor the exact laptop model (e.g., “Dell Latitude 5490 keyboard replacement”). Websites like iFixit provide detailed, photo-heavy instructions that reveal hidden screws, clip locations, and the correct order of operations. This knowledge is your most powerful tool against unexpected complications.
Power Down and Disconnect Completely:The mandatory first step is a full power-down. Then, unplug the AC adapter and, crucially, disconnect the internal battery. For laptops with non-removable batteries, after unplugging the AC adapter, hold down the power button for 15-20 seconds to dissipate any residual power in the system. This eliminates the risk of accidentally powering on the device during the repair and causing a short circuit.
By investing in and consistently using this combination of specialized tools and rigorous pre-planning, you establish a standard of care that minimizes risk and ensures every repair is completed with confidence and precision. This professional discipline is what clients pay for and what protects your business from preventable, expensive mistakes.
The Ultimate Decision Flowchart: Putting the Methodology into Practice
This is where theory meets practice. The following step-by-step guide synthesizes the diagnostic, sourcing, and preparation dimensions into a single, actionable workflow. Adhering to this flowchart minimizes risks, maximizes efficiency, and ensures a professional outcome every time. Think of it as your standard operating procedure for laptop keyboard replacement.
Diagnosis & Procurement (The Decision Phase)
Step 1.1: Execute the Diagnostic Protocol:Rigorously follow the two-tier diagnostic process outlined in Dimension 1. Begin with the BIOS/UEFI testto conclusively determine if the issue is hardware or software-based.
Step 1.2: Confirm the Need for Replacement:Based on the diagnostic result, proceed only if a hardware fault is confirmed (e.g., regional key failure, confirmed cable connection is good). If it’s a software issue, resolve it at the OS level.
Step 1.3: Source the Correct OEM Part:Using the laptop’s full model number(from the bottom label), procure a high-quality OEM replacement keyboard from a reliable supplier. Verify the physical product upon receipt against the old unit to ensure perfect compatibility.
Safety Preparation & Disassembly (The Execution Phase)
Step 2.1: Implement Safety Protocols:Power down the laptop, unplug the AC adapter, and disconnect the internal battery.This is non-negotiable. For added safety, wear an anti-static wrist strap.
Step 2.2: Organized Disassembly:Consult the specific teardown guide for your model. Use your plastic toolsto carefully release clips and a magnetic project matto organize screws by type and location. Work methodically, without using force.
Installation & Verification (The Validation Phase)
Step 3.1: Install the New Keyboard:Carefully connect the new keyboard’s flex cable to the motherboard ZIF (Zero Insertion Force) connector, ensuring it is seated perfectly straight and securely locking the latch. Position the keyboard and secure it with the correct screws.
Step 3.2: Pre-Assembly Smoke Test:Before fully reassembling the laptop, reconnect only the AC adapter(leave the battery disconnected). Power on the device and test basic keyboard functionality. This crucial step ensures everything works before you seal the unit, preventing the need for another full disassembly if there’s an issue.
Step 3.3: Final Reassembly and Full Test:Once the keyboard is confirmed working, power down, disconnect the AC adapter, reconnect the internal battery, and complete the reassembly. Perform a final comprehensive check of all keys and related functions (like backlighting).
By following this structured flow, you move from a confirmed diagnosis to a verified repair in a logical, low-risk sequence. This disciplined approach is what separates a professional, profitable service from a haphazard and risky endeavor.
Post-Replacement Checklist and When to Seek Professional Help
A successful repair is not confirmed the moment the last screw is tightened. The final verification process is what separates a thorough, professional job from an incomplete one. This phase consists of two critical parts: a definitive checklist to ensure full functionality, and the wisdom to recognize when a problem is beyond your current scope, preventing a minor issue from escalating into a major failure.
The Mandatory Post-Installation Verification Checklist
Before returning the laptop to the client, you must methodically work through this checklist. Do not assume success—verify it.
[ ] Full Keyboard Functionality Test:Open a text editor (e.g., Notepad). Methodically press every single key, including all letters, numbers, symbols, the function row (F1-F12), and special keys like Caps Lock, Num Lock, and the media control keys. Observe the on-screen response for each.
[ ] Keyboard Backlight Test (if applicable):If the laptop has a backlit keyboard, test all brightness levels using the function keys. Ensure the lighting is even and there are no dead LEDs.
[ ] Peripheral Function Check:Verify that the touchpad, all USB ports, audio jack, and SD card readerare working perfectly. The disassembly process can sometimes inadvertently loosen the very fine cables connected to these components.
[ ] Physical and Visual Inspection:Check that the keyboard is sitting perfectly flush with the palm rest, with no uneven gaps or raised corners. Confirm that all plastic clips are fully engaged and that you have not created any new scratches or damage during the repair.
[ ] Stress Test:Have the laptop run for a few minutes. Feel the bottom for any unusual heat and listen for abnormal fan noises that might indicate a cable is obstructing ventilation.
The Professional's Red Lines: When to Stop and Call for Backup
True expertise lies in knowing your limits. Encountering one of the following “red lines” is not a sign of failure; it is a signal to exercise professional judgment and prevent catastrophic damage. Persisting beyond this point is the mark of an amateur.
Red Line 1: The Device Fails the “Smoke Test” or Won’t Power On.
What it means:After connecting the new keyboard and performing the pre-assembly smoke test, the laptop shows no signs of life, emits a burning smell, or beeps with error codes.
Underlying Cause:This strongly indicates a motherboard-level issue. This could be an accidental short circuit caused during repair, a static electricity discharge that damaged a chip, or a pre-existing but unrelated motherboard failure that coincidentally manifested now.
Action:IMMEDIATELY STOP.Disconnect all power. This requires the diagnostic equipment and micro-soldering expertise of a specialized board repair technician.
Red Line 2: You Encounter a “Point of No Return” During Disassembly/Reassembly.
Examples:A screw head becomes irreversibly stripped (“stripped screw”); a critical plastic clip breaks off, making secure reassembly impossible; you discover the keyboard is glued down with industrial adhesive (common in ultra-thins like MacBooks and Surfaces) and cannot be safely removed.
Action:STOP FORCING IT.Applying more force will only worsen the damage. A professional repair shop will have specialized tools (e.g., screw extractors, specific glues and clamps) to deal with these situations.
Red Line 3: The New Keyboard (and the Old One) Remain Fully Unresponsive.
What it means:You have installed the new keyboard correctly, reseated the cable multiple times, but it is completely dead. As a control, you reconnect the old keyboard, and it also fails to work.
Underlying Cause:This almost certainly points to a problem with the keyboard connector on the motherboard. The delicate ZIF (Zero Insertion Force) connector’s latch may be broken, or the connector itself may have been damaged. In rare cases, the motherboard’s keyboard controller (a part of the EC chip) has failed.
Action:This is a mainboard repair issue. It requires microscopic inspection and likely component-level repair, which is beyond the scope of a standard keyboard replacement.
The Bottom Line:Crossing these red lines does not mean the repair is impossible—it means it has escalated to a level that requires specialized skills and tools. Recognizing this and seeking professional help is the most responsible and cost-effective decision for both you and the client’s device.
Strategic Summary & Call to Action: Transform Keyboard Replacement into Your Core Competency
The process of replacing a laptop keyboard, when viewed through a strategic lens, is far more than a technical task—it is a powerful microcosm of your entire business’s approach to quality, profitability, and customer trust. The methodology outlined in this guide provides a systematic framework to eliminate uncertainty and risk. By mastering the trifecta of precision diagnosis, strategic OEM sourcing, and flawless execution, you are no longer just swapping parts; you are building a reputation for reliability that customers will pay a premium for and return to time and again.
This transforms a commodity service into a core competency that directly defends and grows your bottom line. The consistent application of this framework ensures that every repair:
Maximizes First-Time Fix Rates,eliminating costly comebacks.
Optimizes Total Cost of Ownership,by prioritizing long-term value over short-term price.
Solidifies Brand Authority,positioning your business as the expert choice in a market often crowded with amateurs.
The ultimate goal is to make this disciplined approach your standard operating procedure—the invisible engine of your quality and profitability.
Your Next Strategic Move
The difference between reading about a strategy and benefiting from it is action. To truly operationalize this framework and gain a tangible competitive edge, we propose a direct collaboration.
High-Value Action: Receive a Customized OEM Sourcing & Efficiency Assessment.
Stop guessing on compatibility and sacrificing profit to supply chain uncertainty. Let us translate this methodology into a concrete plan for your business.
Contact our technical procurement specialists at SUP today for a confidential consultation.Simply provide us with a list of the top 5 laptop models you most frequently service.**
In return, you will receive a personalized assessment that includes:
A tailored OEM keyboard compatibility matrix for your specific needs, ensuring 100% fit and function.
A direct pathway to a more resilient, simplified supply chain with a partner dedicated to your operational excellence.
Take the strategic step to systematize your success. Let’s discuss how a partnership with SUP can make keyboard replacement a predictable, profitable pillar of your business.